This chapter describes how to create action libraries and rule sets for eCognition Architect and how to create a stand alone application that can be installed with eCognition software.
Action Libraries for eCognition Architect
An action is a predefined building block within an image analysis solution. Configured actions can perform different tasks such as object detection, classification or exporting results and sequences of actions represent a ready-to-use solution for accomplishing image analysis tasks.
An action library is a collection of action definitions, which are essentially unconfigured actions; action definitions enable users to specify actions and assemble solutions. To make rule sets usable as unconfigured actions in action libraries, they must be packaged and given a user interface.
In the Analysis Builder window you package pieces of rule sets, each of them solving a specific part of a solution, into action definitions. Action definitions are grouped into libraries and define dependencies on actions. Furthermore, you can create different user interface components (called widgets) for an action library user to adjust action parameters.
For testing the created action libraries with relevant data, you can build analysis solutions in the Analysis Builder window.
Creating User Parameters
As the parameters of an action can be set by users of action libraries using products such as eCognition Architect, you must place adjustable variables in a parameter set.
You should use unique names for variables and must use unique names for parameter sets. We recommend developing adjustable variables of a more general nature (such as ‘low contrast’), which have influence on multiple features instead of having one control per feature.
Additionally, in rule sets to be used for actions, avoid identically named parent processes. This is especially important for proper execution if an eCognition action refers to inactive parts of a rule set.
Creating a Quick Test Button
When creating a Quick Test button in an action, you need to implement a kind of internal communication to synchronize actions with the underlying rule sets. This is realized by integration of specific algorithms to the rule sets that organize the updating of parameter sets, variables, and actions.
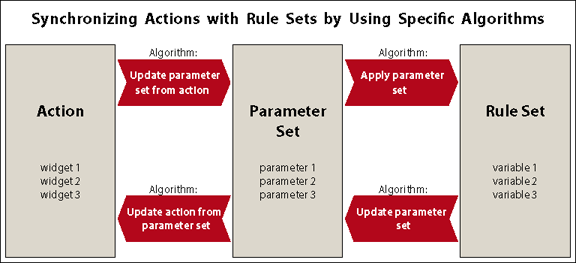
These four specific algorithms are:
- Update Parameter Set From Action
- Update Action From Parameter Set
- Update Parameter Set
- Apply Parameter Set
The first two transfer values between the action and parameter set; the remaining two transfer values between the parameter set and the rule set.
To get all parameters from the action to the rule set before you execute a Quick Test, you need a process sequence like this:
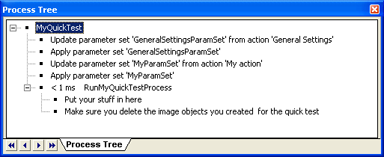
NOTE: General settings must be updated if a rule set relies on them. You should restore everything to the previous state when the quick test is done.
Maintaining Rule Sets for Actions
The developed rule set (.dcp file) will probably be maintained by other developers. Therefore, we recommend you structure the rule set clearly and document it using meaningful names of process groups or comments. A development style guide may assure consistency in the naming of processes, classes, variables and customized features, and provide conventions for structuring rule sets.
Workspace Automation
An action can contain workspace automation subroutines and produce subsets, copies, or tiles as a internal activity of an action. Such actions can be executed as rule sets.
If several actions containing multiple workspace automation subroutines are assembled in one solution .dax file, each action is submitted for processing sequentially, or else an action might search for tiles that do not yet exist because the preceding action is still being processed.
Information kept in parameter sets is transferred between the different stages of the workspace automation. Different subroutines of different actions are able to access variables of parameter sets. When creating actions you should use special Variables Operation algorithms to enable actions to automatically exchange parameter sets.
Creating a New Action Library
Before wrapping a rule set as an action definition, you have to create a new action library.
- Choose Library > New Action Library from the main menu. The Create New Action Library dialog box opens
- Select a Name and a Location for the new action library. Click OK to create the new .dlx file.
- The action library is loaded to the Analysis Builder window. The Analysis Builder window changes its name to Edit Library: Name of the Library. As the editing mode is active, you can immediately start editing the action library.
Assembling and Editing an Action Library
When assembling a new action library, you wrap rule sets as action definitions and give them a user interface. Later, you may modify an existing action library.
- To activate the action library editing mode on your newly created or open library, choose Library > Edit Action Library from the main menu. The Analysis Builder window changes its title bar to ‘Edit Library: Name of the Loaded Action Library.’ Additionally, a check mark left of the menu command indicates the editing mode
- Go to the Analysis Builder window and right-click any item or the background for available editing options. Depending on the right-clicked item you can add, edit, or delete one of the following:
- General settings definition
- Action groups grouping actions
- Action definitions including various Export actions
- Widgets (user interface components) for the properties of action
- Save the edited action library using Library > Save Action Library on the main menu, then close it using Library > Close Action Library
- To deactivate the editing mode, go to Library > Edit Action Library. The window title bar reverts to Analysis Builder.
Editing Action Library Properties
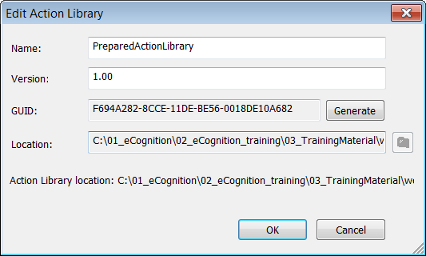
Selecting Library > Action Library Properties brings up the Edit Action Library dialog box. The dialog has fields which allow you to edit the name and version of your action library.
To create a globally unique identifier (GUID), press the Generate button. Generating a new GUID when an action library is amended is a useful way for a developer to notify an action library user of changes, as the software will tell the user that the identifier is different.
Editing Action Groups
Every action is part of a certain action group. If the appropriate action group does not yet exist, you have to create it.
- To create an action group, go to upper pane of the Analysis Builder window (now called Edit Library: Name of the Loaded Action Library) and right-click any item or the background and choose Add Group. The new action group is added at the bottom of the existing action group list
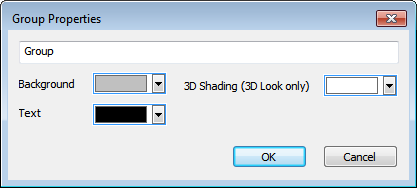
- To modify an action group, double-click it, or right-click it and select Edit Group. The Edit Group dialog box opens
- Edit the name, background, text and shading color of the action group.
- Before deleting an action group you have to delete all contained action definitions.
- To move an action group, right-click it and select Move Group Up or Move Group Down
- To delete an action group, right-click it and select Delete Group.
Editing Action Definitions
Action definitions are unconfigured actions, which enable users of action libraries to specify actions that act as building blocks of a specific solution. You can define an action definition by transforming a rule set related to a specified part of the solution. Alternatively, you can import an action definition from an .xml file to an action library.
To edit action definitions, you’ll need to have loaded a rule set file (.dcp file) into the Process Tree window, which contains a rule set related to a specified part of the solution. The rule set must include a parameter set providing variables to be adjusted by the user of the action library.
- To create an action definition, go to the Analysis Builder window, select and right-click any action group or the background and choose Add Action Definition or one of the standard export action definitions:1
- Add Export Domain Statistics
- Add Export Object Data
- Add Export Project Statistics
- Add Export Result Image
The new action definition item is added at the bottom of the selected action group.
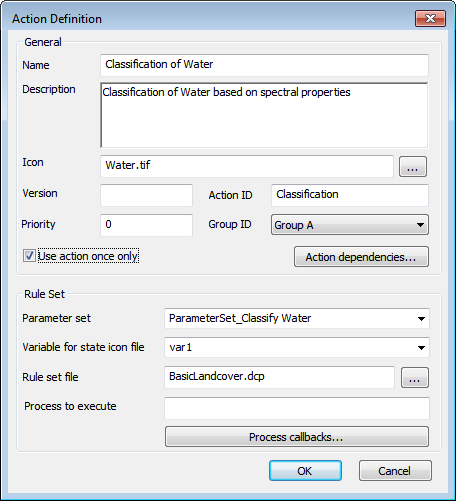
- If you have sequenced two actions or more in an action group, you may rearrange them using the arrow buttons on the right of each action item. To edit an item, right-click it and choose Edit Action Definition (or double-click the item). The Action Definition dialog box opens.
- The first two fields let you add a name and description, and the Icon field gives an option to display an icon on the action user interface element
- Action ID allows a rule set to keep track of the structure of the analysis and returns the number of actions in the current analysis with a given ID
- Priority lets you control the sorting of action lists – the higher the priority, the higher the action will be displayed in the list
- The Group ID reflects the current group the action belongs to. To move it select another group from the drop-down list box
- Clear the Use Only Once check box to allow multiple actions of a solution.
- Providing default actions for building solutions requires consideration of dependencies on actions. Click the Dependencies button to open the Edit Action Dependencies dialog box.
- Select the appropriate parameter set holding the related variables. The Parameter Set combo box offers all parameter sets listed in the Manage Parameter Sets dialog box.
- Variable for state icon file allows you to select variable that contains the name of an icon to be displayed on the right-hand side of the action bar. You can use this to display an icon reflecting the current state of the action (and access and modify the state in your rule set).
- Load the rule set in the Rule Set File field as a .dcp file.
- In Process to Execute, enter the name and the path of the process to be executed by the action when it is executed on the server.
- You can use your rule set to react to certain predefined events. Click on the process callbacks button and define the rule set path to be executed when the event occurs.
- Confirm with OK.
Editing Action Dependencies
Providing action definitions to other users requires consideration of dependencies, because actions are often mutually dependent. Dependency items are image layers, thematic layers, image object levels, and classes. To enable the usage of default actions for building solutions, the dependencies on actions concerning dependency items have to be defined. Dependencies can be defined as follows:
- The dependency item is required for an action.
- The dependency item is forbidden for an action.
- The dependency item is added, created, or assigned by an action.
- The dependency item is removed or unassigned by an action.
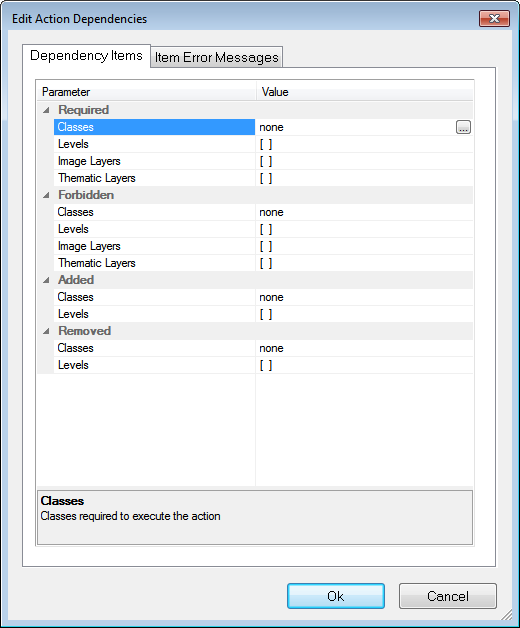
- To edit the dependencies, go to the Edit Action Definition dialog box and click the Dependencies button. The Edit Action Dependencies dialog box opens.
- The Dependency Item tab gives an overview of which items are required, forbidden, added, or removed. To edit the dependencies, click the ellipsis button located inside the value column, which opens one of the following dialog boxes:
- Edit Classification Filter, which allows you to configure classes
- Select Levels, to configure image object levels
- Select Image Layers
- Select Thematic Layers.
- In the Item Error Messages tab you can edit messages that display in the properties panel to the users of action libraries, in cases where the dependency on actions cause problems. If you do nothing, a default error message is created.
Loading Rule Sets for Use in Action Libraries
If your action library requires a rule set to be loaded, it is necessary to edit the dix file, which is created automatically when a new action library is constructed. Insert a link to the rule set file using the following structure, using a text editor such as Notepad. (The <Preload> opening and closing tags will already be present in the file.)
<Preload> <Ruleset name="ruleset.dcp"/> </Preload>
Updating a Solution while Developing Actions
A configured solution can be automatically updated after have you have changed one or more actions in the corresponding action library.
This option enables rule set developers to make changes to actions in an action library and then update a solution without reassembling actions as a solution. The menu item is only active when a solution is loaded in the Analysis Builder window.
- To update the open solution, choose Library > Update Solution from the main menu. All loaded processes are deleted and reloaded from the open action library. All the solution settings displayed in the Analysis Builder are preserved.
- You can now save the solution again and thereby update it to changes in the rule set files.
Building an Analysis Solution
Before you can analyze your data, you must build an analysis solution in the Analysis Builder window.
To construct your analysis solution, you can choose from a set of predefined actions for object detection, classification and export. By testing them on an open project, you can configure actions to meet your needs. With the Analysis Builder, you assemble and configure these actions all together to form a solution, which you can then run or save to file.
The Analysis Builder Window
Image analysis solutions are built in the Analysis Builder Window. To open it, go to either View > Windows > Analysis Builder or Analysis > Analysis Builder from the main menu. You can use View > Analysis Builder View to select preset layouts.
When the Analysis Builder window opens, ensure that the name of the desired action library is displayed in the title bar of the Analysis Builder window.
The Analysis Builder window consists of two panes. In the upper pane, you assemble actions to build solutions; in the lower properties pane you can configure them by customizing specific settings. Depending on the selected action, the lower properties pane shows which associated settings to define. The Description area displays information to assist you with the configuration.
The Analysis Builder Toolbar
The Analysis Builder Toolbar may be used to display widgets that are not attached to an action, but are always available to the user. To open it, go to Analysis > Analysis Builder from the main menu.
Opening and Closing Action Libraries
To open an existing action library, go to Library > Open Action Library in the main menu. The name of the loaded action library is displayed in the title bar of the Analysis Builder window. The action groups of the library are loaded in the upper pane of the Analysis Builder window.
If you open an action library after opening a project, all rule set data will be deleted. A warning message will display. To restore the rule set data, close the project without saving changes and then reopen it. If you are using a solution built with a older action library, browse to that folder and open the library before opening your solution.
You can close the current action library and open another to get access to another collection of analysis actions. To close the currently open action library, choose Library > Close Action Library from the main menu. The action groups in the upper pane of the Analysis Builder window disappear. When closing an action library with an assembled solution, the solution is removed from the upper pane of the Analysis Builder window. If it is not saved, it must be reassembled.
You can close the current action library and open another to get access to another collection of analysis actions. To close the currently open action library, choose Library > Close Action Library from the main menu. The action groups in the upper pane of the Analysis Builder window disappear. When closing an action library with an assembled solution, the solution is removed from the upper pane of the Analysis Builder window. If it is not saved, it must be reassembled.
Assembling a Solution from Actions in the Analysis Builder
In the Analysis Builder window, you assemble a solution from actions and configure them in order to analyze your data. If not already visible, open the Analysis Builder window.
- To add an action, click the button with a plus sign on the sub-section header or, in an empty section click Add New. The Add Action dialog box opens
- Select an action from the Add Action dialog box and click OK. The new action is added to the solution. According to the type of the action, it is sorted in the corresponding group.
- To move an action, you can click on the small arrows on the right hand side of the action bar, or drag the action bar to the desired position.
- To remove an action from your solution, click the button with a minus sign on the right of the action bar
- Icons inform you about the state of each action:
- A red error triangle indicates that you must specify this action before it can be processed or another action must be processed previously. The green tickmark indicates that the action has been processed successfully.
Selecting an Action
To select an action for the analysis solution of your data, click on a plus sign in an Action Definition button in the Analysis Builder window. The Add Action dialog box opens.
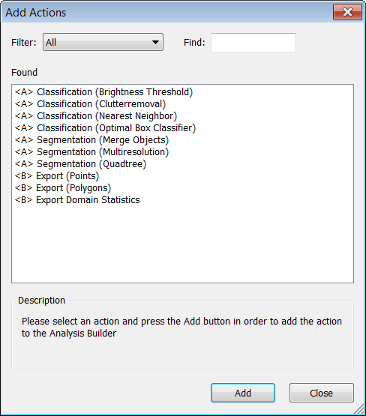
The filter is set for the action subset you selected. You can select a different filter or display all available actions. The Found area displays only those actions that satisfy the filter setting criteria. Depending on the action library, each action is classified with a token for its subsection, e.g. <A> for segmentation and classifications or <B> for export actions.
To search for a specific action, enter the name or a part of the name in the Find Text box. The Found area displays only those actions that contain the characters you entered. Select the desired action and confirm with OK. The new action is displayed as a bar in the Analysis Builder window. You must now set the properties of the action:
- Go to the Analysis Builder window
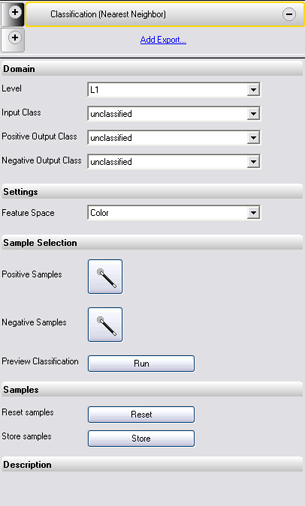
- In the upper sequencing pane, select the action you want to customize2
- Configure the action in the lower properties pane by customizing various settings.
Settings
For each solution you must define specific settings. These settings associate your image data with the appropriate actions.
Saving and Loading Analysis Solutions
- You can save analysis settings in the Analysis Builder as solution files (extension .dax) and load them again, for example to analyze slides.
- To save the analysis settings, click the Save Solution to a File button on the Architect toolbar or Library > Save Solution on the main menu
- Alternatively, you can encrypt the solution by selecting Save Solution Read-Only on the Architect toolbar or Library > Save Solution Read-Only from the main menu.
To load an already existing solution with all the analysis settings from a solution file (extension .dax) to the Analysis Builder window, go to Library > Load Solution on the main menu. To use a solution that was built with another action library, open the action library before opening your solution. The solution is displayed in the Analysis Builder window.
If you want to change a solution built with an older action library, make sure that the corresponding action library is open before loading the solution. 3
Testing and Improving Solutions
- Testing and improvement cycles might take some time. Here are some tips to help you to improve the results:
- Use the Preview that some actions provide to instantly display the results of a certain setting in the map view.
- To execute all assembled actions, click the Run Solution button on the Architect toolbar. Alternatively, choose Analysis > Run Solution from the main menu
- To execute all actions up to a certain step, select an action and click the Run Solution Until Selected Action button on the Architect toolbar. Alternatively, choose Analysis > Run Solution Until Selected Action from the main menu. All actions above and including the selected action will be executed.
- To improve the test processing time, you can test the actions on a subset of your project data.
To test and improve analysis:
- For faster testing use the Run Selected Action button on the Architect toolbar. Alternatively, you can remove already tested actions; delete them from the Analysis Builder window and add them later again. You can also save the actions and the settings as solution to a .dax file. When removing single actions you must make sure that the analysis job remains complete.
- To execute a configured solution not locally but on the eCognition Server, select a project in the workspace window. Click the Run Solution on eCognition Server button on the Architect toolbar. This option is needed if the solution contains actions with workspace automation algorithms.
Importing Action Definitions
To get access to new, customized or special actions, you have to load action definitions, which are simply unconfigured actions. If not yet available in the Add Actions dialog box, you can load additional action definitions from a file to an action library. This can be used to update action libraries with externally defined action definitions.
Action definitions can be created with the eCognition Developer. Alternatively, eCognition offers consulting services to improve your analysis solutions. You can order special task actions for your individual image analysis needs.
To use an additional action definition you have import it. Beside the .xml file describing the action definition, you need a rule set file (.dcp file) providing a rule set that is related to a specific part of the solution. The rule set has to include a parameter set providing variables to be adjusted by the user of the action library.
- Copy the action definition files to the system folder of your installation.
- Choose Library > Import Action on the main menu. Select an .xml file to load.
- Now the new unconfigured action can be selected in the Add Actions dialog box.
Hiding Layers and Maps
eCognition Developer users have the option of changing the visibility settings for hidden layers and hidden maps (see Tools > Options). This is a global setting and applies to all portals (the setting is stored in the UserSettings.cfg file). The default value in the Options dialog is No and all hidden layers are hidden.
Saving Configured Actions with a Project
To facilitate the development of ruleware, you can save your configured action with single projects and come back to them later. A saved project includes all actions and their configurations, which are displayed in the Analysis Builder window in the moment the project was saved.
Configured actions can only be restored properly if the open action library was open when saving, because the action library provides corresponding action definitions.
Creating Calibration Parameter Set Files
You can create a calibration to store the General Settings properties as a Parameter Set file. Therefore, you can save and provide common settings for common image readers, for example, as part of an application. A calibration set stores the following General Settings properties:
- Bit depth
- Pixel resolution in mm/pixel
- Zero-based IDs of the Image Layers within the scene used to store the scheme of used image layers for image analysis. Example of scene IDs: If a scene consists of three image layers, the first image layer has ID 0, the second image layer has ID 1, and the third image layer has ID 2.
To create a calibration, set the General Settings properties in the lower properties pane of the Analysis Builder window.
For saving, choose Library > Save Calibration from the main menu. By default, calibration parameter set files with the extension .psf are stored in C:\Program Files\Trimble\eCognition Developer\bin\applications.
Editing Widgets for Action Properties and the Analysis Builder Toolbar
Widgets are user interface elements, such as drop-down lists, radio buttons and checkboxes, that the users of action libraries can use to adjust settings.
To create a widget in the Analysis Builder window, first select an action definition in the upper pane of the window. You must structure the related parameters in at least one property group in the lower pane of the Analysis Builder window. Right-click the background of the lower pane and select Add Group. Select a group or widget and right-click it to add it – the following widgets are available:
- Checkbox
- Drop-Down List
- Button
- Radio Button Row
- Toolbar
- Editbox
- Editbox with Slider
- Select Class
- Create Class
- Select Feature
- Select Multiple Features
- Select File
- Select Level
- Select Image Layer
- Select Thematic Layer
- Select Array Items
- Select Folder
- Slider
- Edit Layer Names
- Layer Drop-Down List
- Manual Classification Buttons
To create a widget in the Analysis Builder Toolbar right-click in the Analysis Build Toolbar and select one of the available widgets in the context menu.
- Drop-down list
- Toolbar
Choose one of the Add (widget) commands on the context menu. The Widget Configuration dialog box opens.
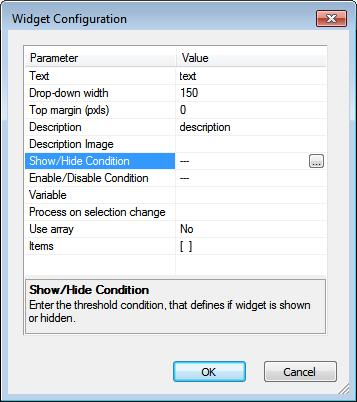
- Select a variable and configure any additional settings.
- Edit a Description text for each widget. The Description text is displayed only when the Edit Action Library mode is switched off and the mouse is located over the related widget area.
- The new widget is added at the bottom of the selected group or below the selected item.
- Save the edited action library by choosing Library > Save Action Library from the main menu.
- To move the widget within its group right-click it and choose Move Up or Move Down on the context menu.
- To modify a widget, just double-click it or right-click it and choose Edit on the context menu.
- To delete a widget, right-click it and choose Delete from the context menu.
Exporting Action Definition to File
Export an action definition to file. This can be used to extend action libraries of eCognition Architect users with new actions definitions.
- To export an action definition, select an action in the Analysis Builder window and choose Library > Export Action on the main menu.
- Select the path and click OK.
1 Standard export actions are predefined. Therefore the underlying processes cannot be edited and some of the following options are unavailable. (↑)
2 Some actions can be selected only once. If such an action is already part of the analysis, it does not appear in the Add Action dialog box (↑)
3 When you open a solution file (extension .dax), the actions are compared with those of the current action library. If the current action library contains an action with the same name as the solution file, the action in the current Action Library is loaded to the Analysis Builder window. This does not apply when using a solution file for automated image analysis. (↑)
Applications for eCognition Developer and Architect
To create a standalone application you need:
- an action library
- a default solution default.dax that will be loaded when the user starts the application
- the ApplicationTemplate folder located in your eCognition Developer installation folder (e.g. C:\Program Files\Trimble\eCognition Developer 10.5\bin\applications)
Creating an application
Follow these simple steps to create your application:
- Copy the ApplicationTemplate to a location of your choice and rename it to a name of your choice .
- Copy your default solution into the Solutions folder and rename it to default.dax.
- Copy the ActionLibrary folder into your application folder (ActionLibrary and Solutions are on the same level).
- Rename the file platform.asd.template to platform.asd.
You can customize your application further modifying the respective fields in platform.asd:
- Custom name: change the name field
- Custom icon: add an .ico file to your application folder and change the icon field appropriately
- Custom perspective(s): create perspectives using "save current view" in developer and use them to replace the perspectives in the application folder. You can further specify which perspective will be shown when you start the application by indicating the perspective number in the default-perspective field in the platform.asd file
Creating an installer
Based on the installer for eCognition Architect or Developer you can create a custom installer that will install your application.
- Create a folder "applications" in your installer (same level as eCognition-setup-x64.exe)
- Copy your application(s) into the applications folder
If you now execute eCognition-setup-x64.exe, your application will be installed.
